How To: Tying the Redfish Slider
The Redfish Slider Fly
In this tutorial we will be tying the Redfish Slider, a refined variant of the classic Borski Slider, specifically designed to target Redfish. This fly has quickly become a favorite among saltwater anglers for its ability to imitate the small crustaceans—like crabs and shrimp—that Redfish love to chase in shallow water environments.
The key features of the Redfish Slider is its deer hair head designed to push a lot of water and demand a strong presence in the water while the streamlined body and flowing tail can add some great movement in the water. The pattern allows for a lifelike presentation that mimics the natural behavior of prey, whether it’s slowly crawling along the bottom or darting away in a quick burst.
In this tutorial, we’ll walk you through each step of tying the Redfish Slider in the Olive/Blue Crab color, covering the materials and techniques that make this fly so effective. Whether you’re an experienced tyer looking to expand your arsenal or new to fly tying, this guide will help you create a fly that’s perfectly suited for targeting Redfish in various conditions. Let’s get started and bring the Redfish Slider to life!
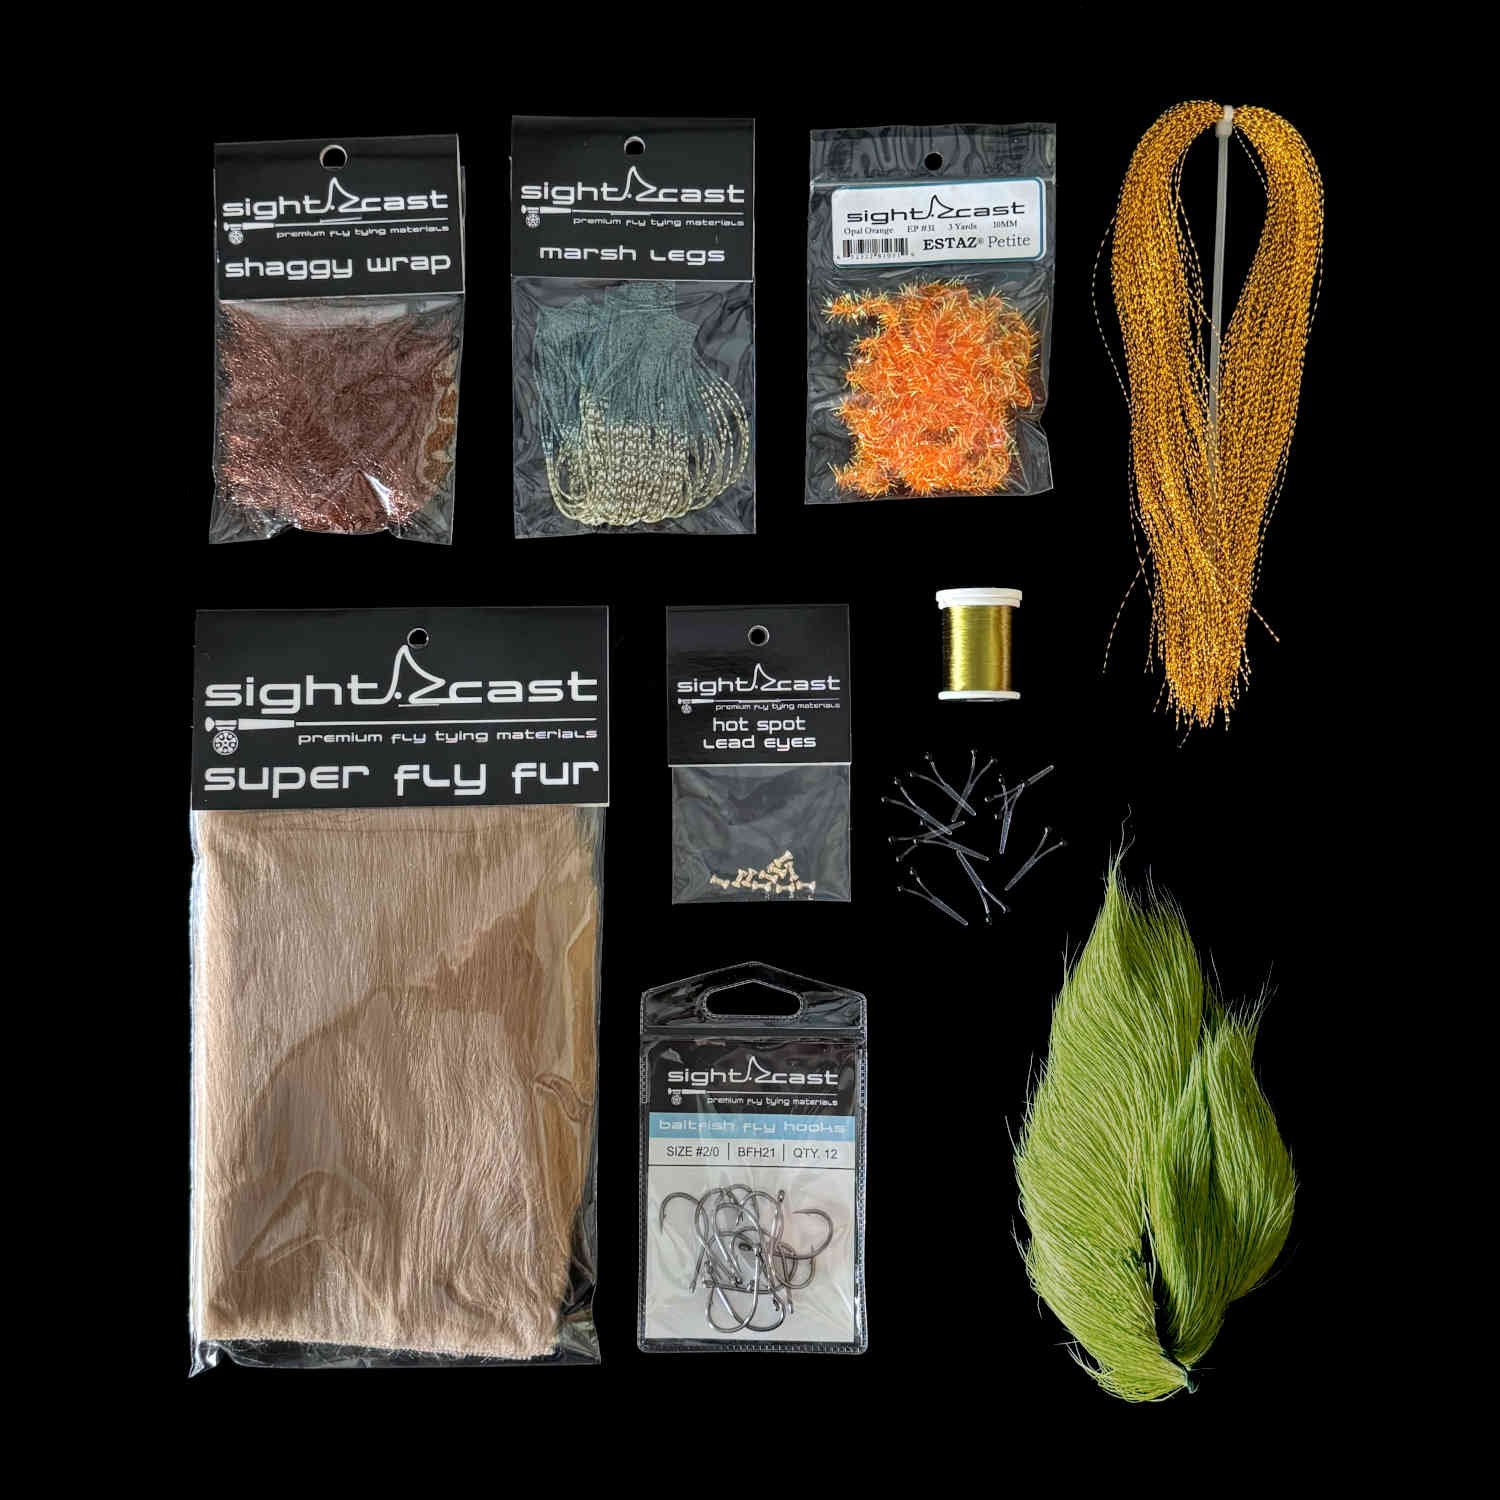
FLY TYING MATERIALS
(scroll down to the bottom to see the recipes for six effective color combinations)
Lead Eyes: Hot Spot Lead Eyes
Eyes: Easy Shrimp Eyes
Hot Spot: Estaz Petite
Tail: Super Fly Fur
Flash: Krystal Flash
Legs: Marsh Legs
Body: Shaggy Wrap
Head: Deer Hair
Thread: SCFC Flat Waxed Nylon
Hook: Size #2/0 - BFH21 Baitfish Fly Hook
HOW TO TIE A REDFISH SLIDER FLY
STEP 1:
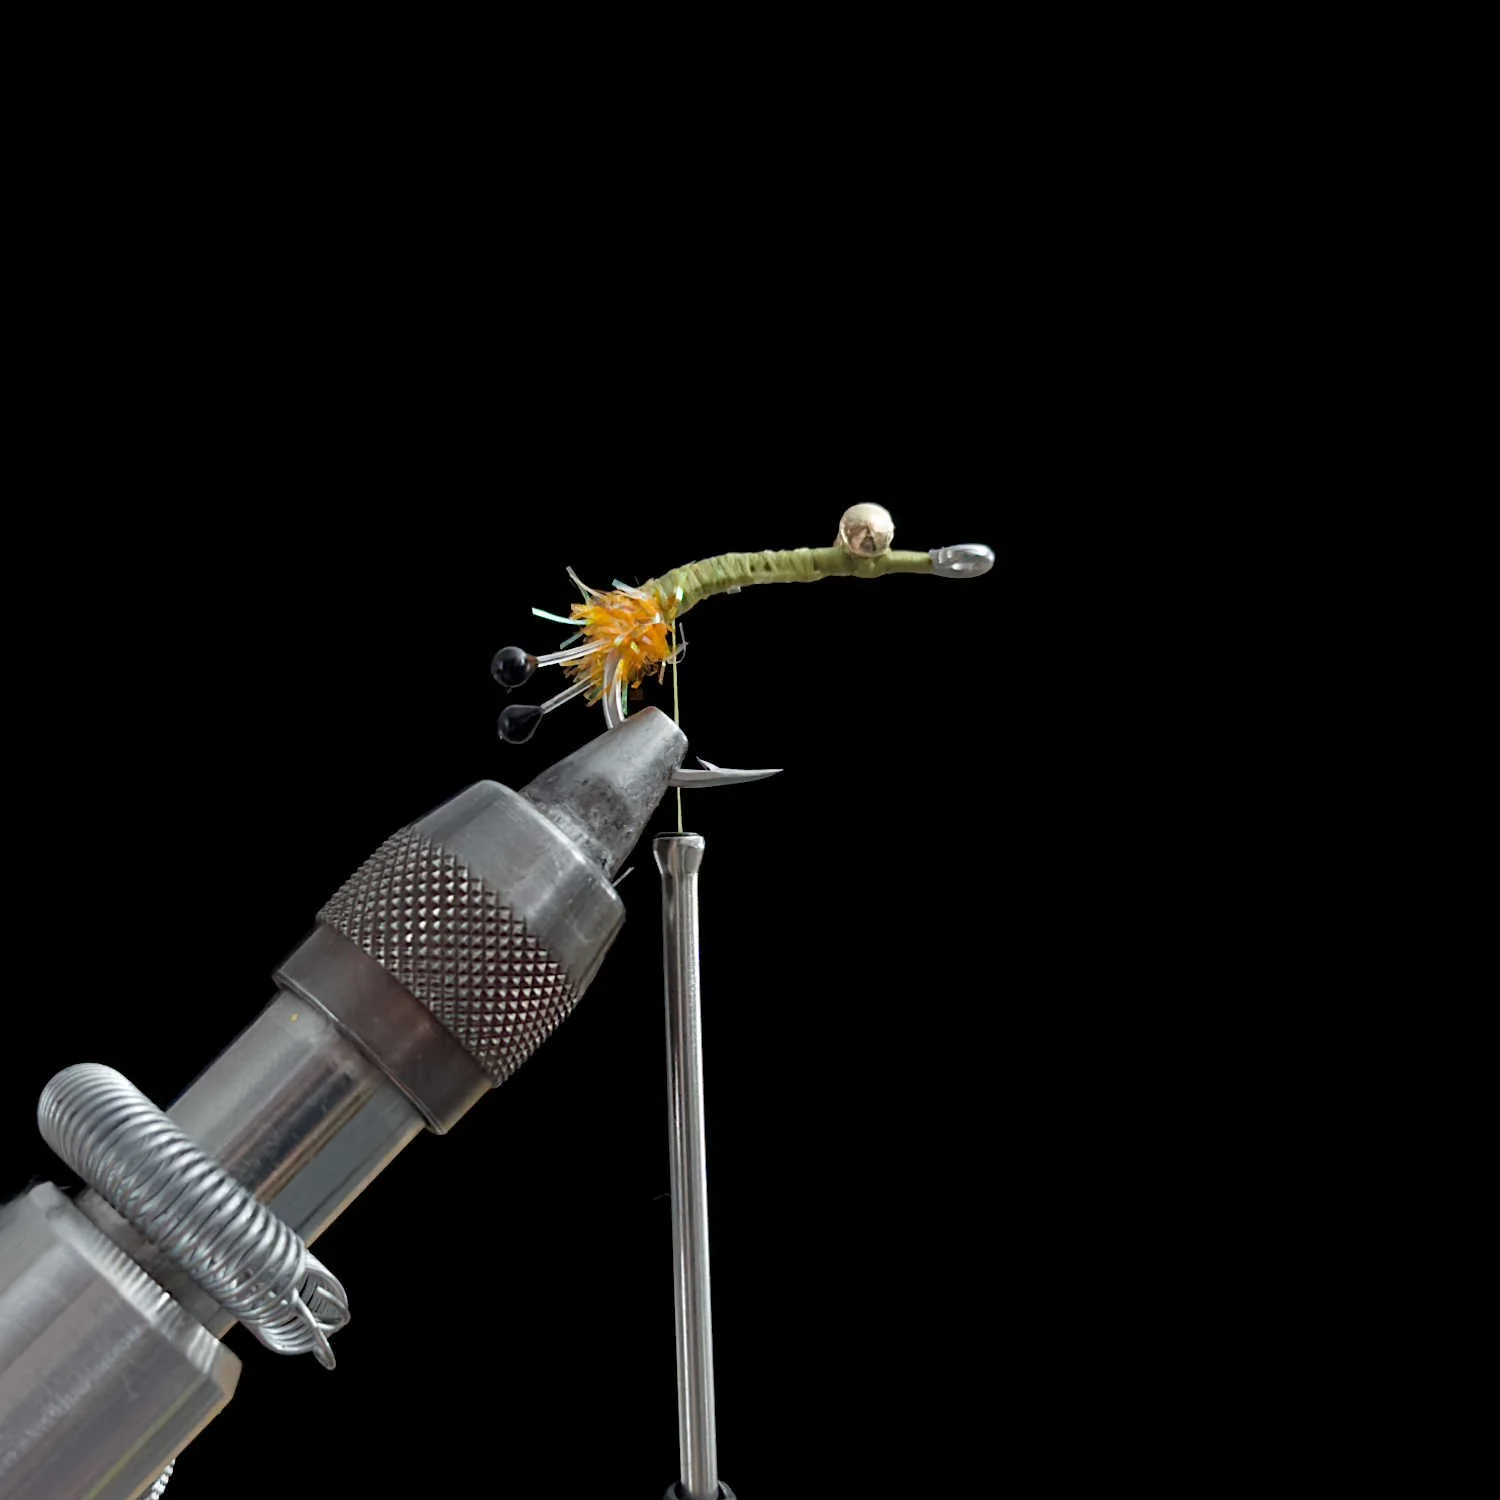
Start by building a solid base of thread on the hook shank and then tie in some Hot Spot Lead Eyes about 1/8” from the eye of the hook.
Step 2:
Wrap your thread past the bend of the hook and secure a pair of Easy Shrimp Eyes. The eyes should slightly bend upward following the bend of the hook.
Step 3:
Tie in a piece of Estaz Petite and wrap approximately 3-4 times at the bend of the hook. When finished, the Estaz should be level with the top of the hook shank.
This is commonly called a “Hot Spot” or “Egg Sack”. It provides a pop of color and helps keep the tail material propped up to avoid fouling.
Tip: When wrapping the Estaz, criss-cross between the Easy Shrimp Eyes a few times to help splay the eyes outward.
Step 4:
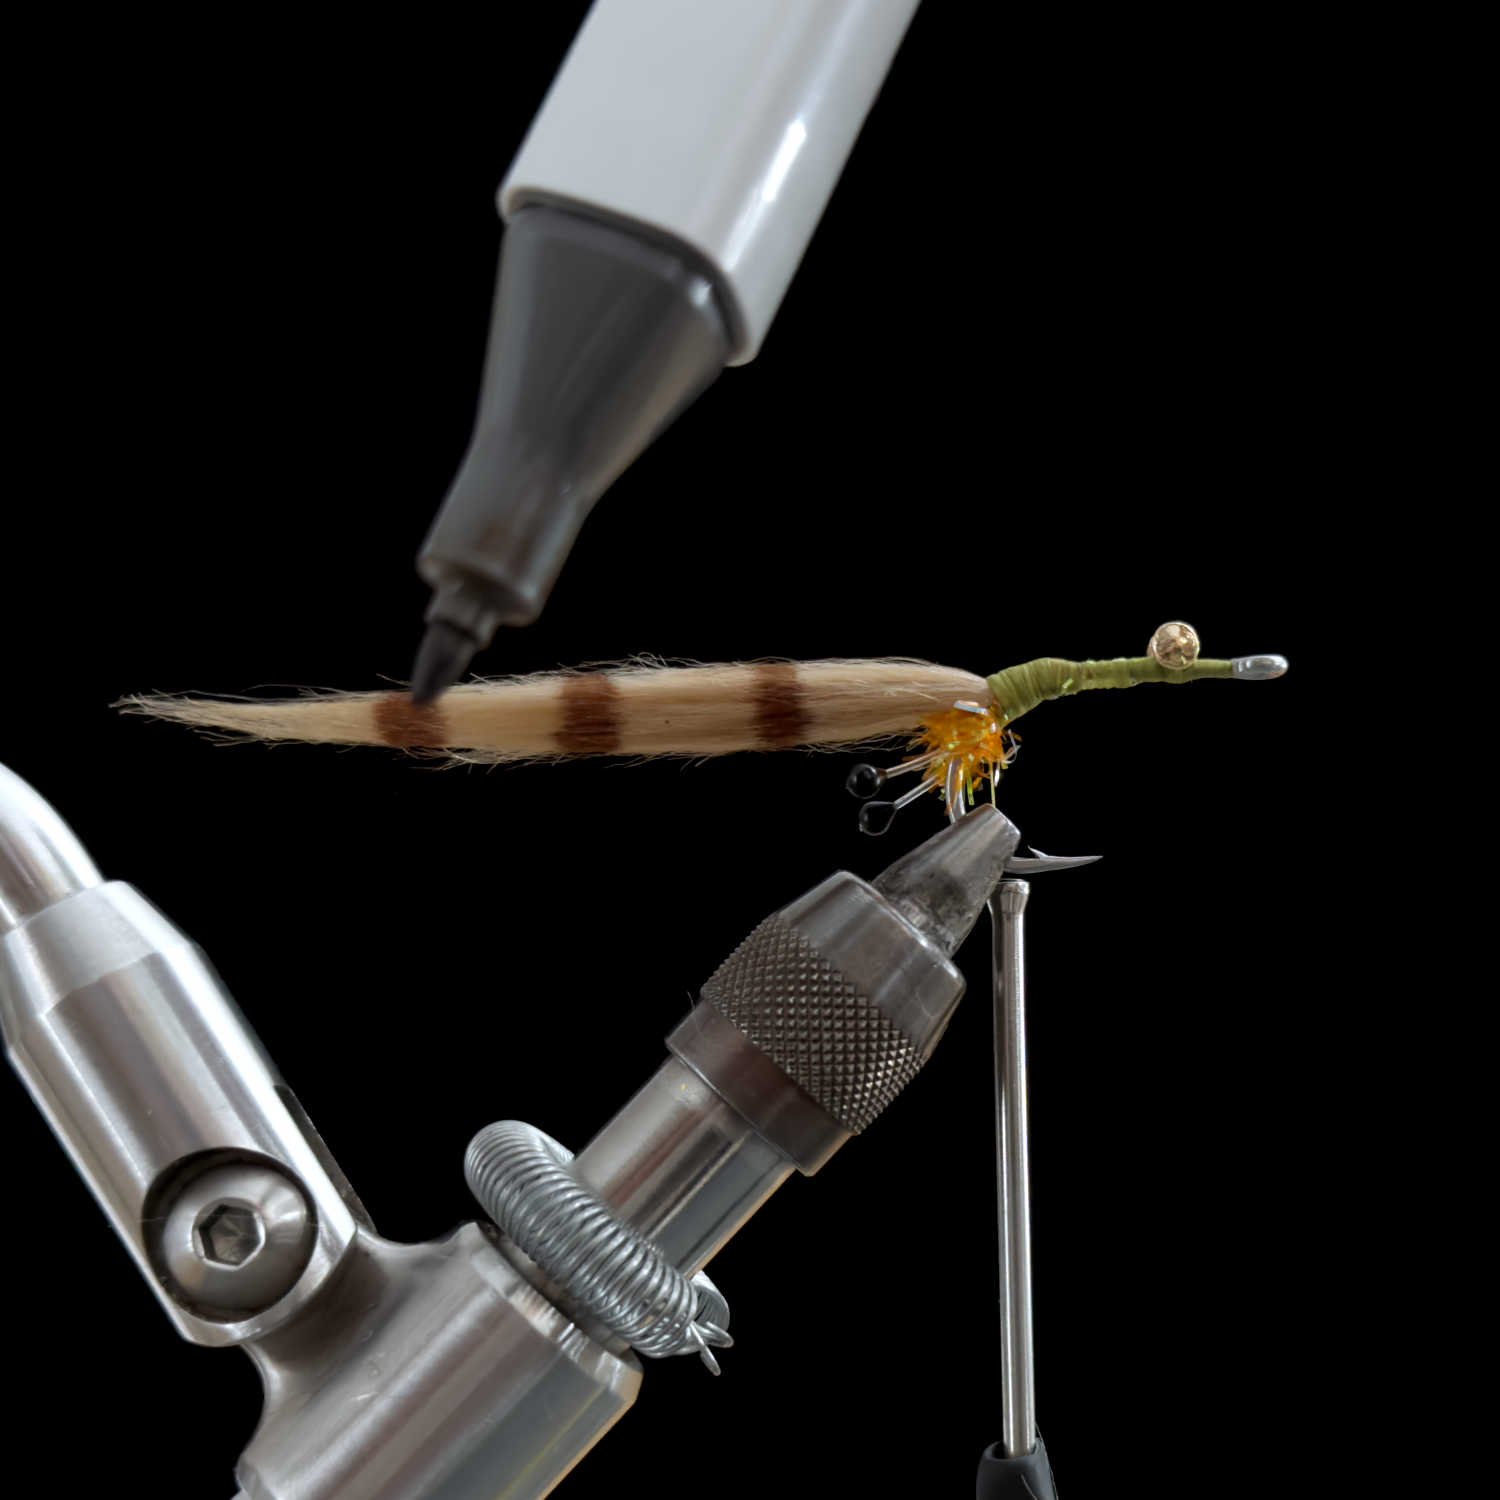
Tie in a small piece of Super Fly Fur just in front of the Hot Spot.
The tail length should be approximately 2.5” in length.
A better alternative than your standard Craft Fur. Featuring hair fibers that are more subtle, finer, and thinner which allows for some awesome underwater movement. Use it for adding tails and wings on all your favorite saltwater patterns.
Step 7:
Tie in two Marsh Legs. Spread the legs to both sides of the fly. Half on the left side, and half on the right side.
Note the position of the thread as it hangs from the bobbin. After tying in the legs, the thread should be in line with the barb of the hook, or close to it. This is a good measurement of the tie in location for the next step.
Step 8:
Next, tie in some Shaggy Wrap and continue wrapping all the way to the lead eyes.
Be sure to pull the fibers rearward after each wrap to avoid any trapped fibers and to ensure they are facing the direction of the tail.
A chenille designed to give your flies a buggy appearance. Great to use for building collars and creating gnarly bodies that will come alive in the water.
Step 9:
Grab an Ultimate Bodkin and tease out all the fibers. Comb and brush out all the tangles and align the fibers perpendicular to the hook shank to prepare for trimming.
Step 10:
Trim the fibers to create at the angle shown in the picture. Cut the fibers short in the front and leave the fibers in the rear at full length.
Designed by fly tyers and built for fly tyers. One tool for all your fiber management needs. Featuring a bodkin, a teaser brush, and a fine-tooth comb, this tool has everything you need for fine-tuning and finishing your flies. Use it for picking out fibers, teasing out dubbing, combing out tangles, applying precise amounts of glue, and more.
Step 12:
The next step is to build the head of the fly. Begin by cutting off a pinch of deer hair. The amount of hair removed from the patch should be approximately the size of a dime.
Step 13:
Invert the fly in the vise and place the clump of deer hair on the underside of the hook.
The tips of the hair should be pointing rearward and measured up to the bend of the hook.
The ends of the hairs should be pointing toward the eye of the hook.
Note: It is not necessary to use a deer hair stacker as the natural taper of the hair will give it a “buggy” appearance.
Step 15:
Since the loose wraps of thread in the previous step are holding the hairs in place, shift your fingers under the hair to pinch and hold it there to prevent the hairs from spinning around the hook shank.
Now you’re ready to pull up on the thread with your bobbin to tighten up the thread wraps.
The classic lead dumbbell eyes you know and love are now available in 16 fishy colors that are sure to compliment any color fly you’re tying up.
Step 18:
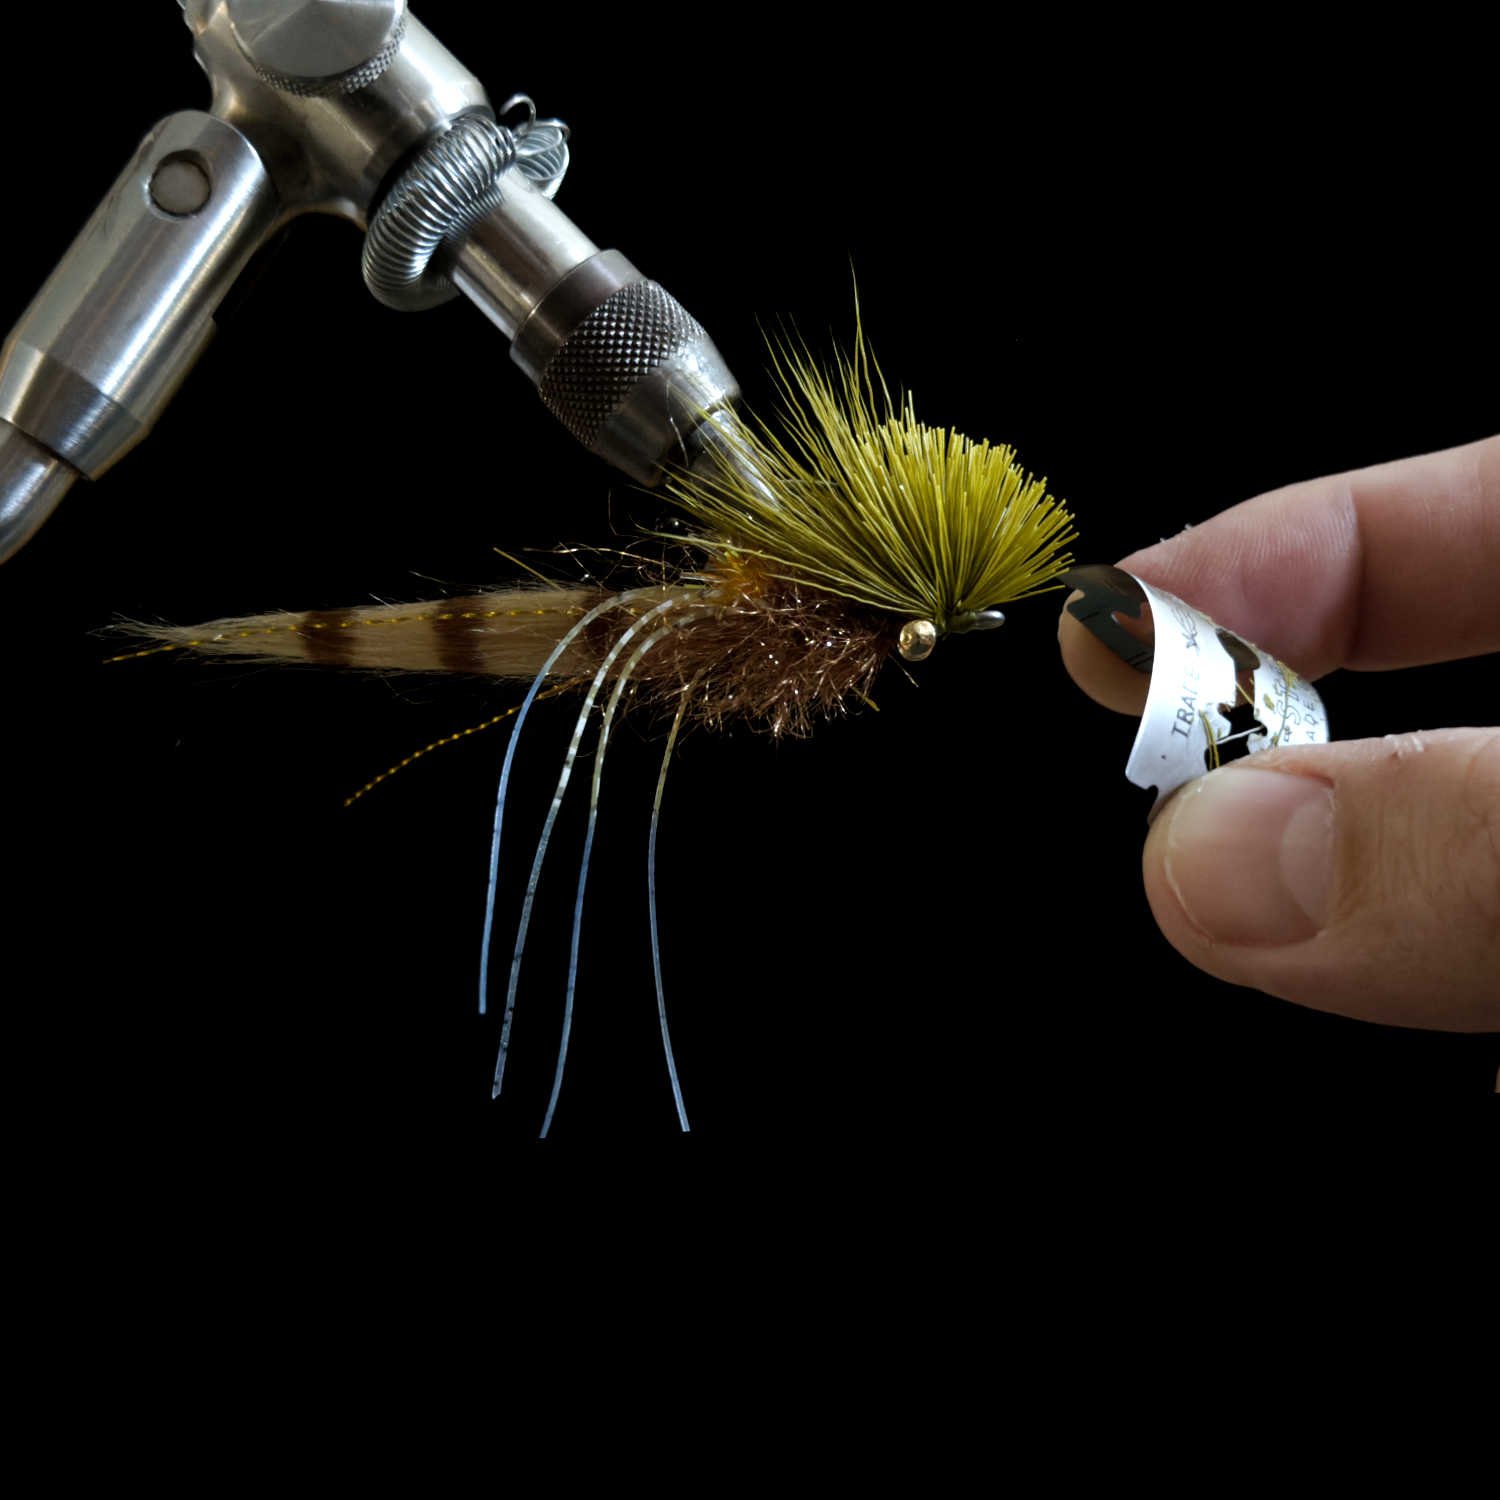
Now we’re ready to give the fly a little trim and we’re all done! With a double-edge razor blade hold it with a slight bend and cut the ends of the hairs at an angle.
Note: If you look back at Step 13, the ends of the hairs that were pointing towards the eye of the hook are the hairs that need to be trimmed. The tips of the hairs pointing rearwards do not trim.
Finished:
Complete the fly by fine tuning and trimming the deer hair to your desired look, then trim the Marsh Legs and Krystal Flash to the same length as the tail.
Use Solarez UV Resin to cover all the exposed thread wraps for added durability.
See below for the recipes of six effective color combinations of the Redfish Slider.
Olive/Blue Crab
Lead Eyes: Hot Spot Lead Eyes - Gold
Eyes: Easy Shrimp Eyes - Black
Hot Spot: Estaz Petite - Orange
Tail: Super Fly Fur - Tan
Flash: Krystal Flash - Gold
Legs: Marsh Legs - Olive/White - Blue Tip
Body: Shaggy Wrap - Rootbeer
Head: Deer Hair - Olive
Thread: SCFC Flat Waxed Nylon - Olive
Hook: Size #2/0 - BFH21 Baitfish Fly Hook
Tan/Blue Crab
Lead Eyes: Hot Spot Lead Eyes - Gold
Eyes: Easy Shrimp Eyes - Black
Hot Spot: Estaz Petite - Orange
Tail: Super Fly Fur - Tan
Flash: Krystal Flash - Gold
Legs: Marsh Legs - Blue/White - Orange Tip
Body: Shaggy Wrap - Light Blue
Head: Deer Hair - Tan
Thread: SCFC Flat Waxed Nylon - Tan
Hook: Size #2/0 - BFH21 Baitfish Fly Hook
Copper/Rust
Lead Eyes: Hot Spot Lead Eyes - Copper
Eyes: Easy Shrimp Eyes - Black
Hot Spot: Estaz Petite - Orange
Tail: Super Fly Fur - Tan
Flash: Krystal Flash - Copper
Legs: Marsh Legs - Copper/Brown - Orange Tip
Body: Shaggy Wrap - Rootbeer
Head: Deer Hair - Rusty Brown
Thread: SCFC Flat Waxed Nylon - Burnt Orange
Hook: Size #2/0 - BFH21 Baitfish Fly Hook
Purple/Black
Lead Eyes: Hot Spot Lead Eyes - Silver
Eyes: Easy Shrimp Eyes - Midnight Purple
Hot Spot: Estaz Petite - Purple
Tail: Super Fly Fur - Black
Flash: Krystal Flash - UV Purple
Legs: Marsh Legs - Clear/Black - Purple Tip
Body: Shaggy Wrap - Purple
Head: Deer Hair - Black
Thread: SCFC Flat Waxed Nylon - Purple
Hook: Size #2/0 - BFH21 Baitfish Fly Hook
Olive/Chartreuse
Lead Eyes: Hot Spot Lead Eyes - Gold
Eyes: Easy Shrimp Eyes - Fl. Yellow
Hot Spot: Estaz Petite - Chartreuse
Tail: Super Fly Fur - Tan
Flash: Krystal Flash - Gold
Legs: Marsh Legs - Pearl Brown - Chartreuse Tip
Body: Shaggy Wrap - Olive
Head: Deer Hair - Olive
Thread: SCFC Flat Waxed Nylon - Tan
Hook: Size #2/0 - BFH21 Baitfish Fly Hook
White/Sand
Lead Eyes: Hot Spot Lead Eyes - Gold
Eyes: Easy Shrimp Eyes - White
Hot Spot: Estaz Petite - Rootbeer
Tail: Super Fly Fur - White
Flash: Krystal Flash - Gold
Legs: Marsh Legs - Sand/Brown - White Tip
Body: Shaggy Wrap - Sand
Head: Deer Hair - Tan
Thread: SCFC Flat Waxed Nylon - Beige
Hook: Size #2/0 - BFH21 Baitfish Fly Hook
Sight Cast Fishing Company
We provide a line of products that are designed for those that live and breathe the shallow flats and backwater marshes. Our passion is saltwater fly fishing and we aim to provide top quality flies and fly tying materials designed for the Gulf Coast fly fisherman. Many of the materials used in this fly are available in the Tying Materials section of the website. You can also purchase this fly and many others that are already tied up and ready to fish in the Fly Shop. Good luck out there on the water!


